User Manual [EVO ELEMENT]
WELCOME
Dear User,
- any updates on this document,
- current products’ libraries,
- current products’ firmware,
- RMA procedure
SAFETY INFORMATION
TECHNICAL SPECIFICATION
| dimensions | 866 x 205 x 189mm | |||
| (34.09 x 8.07 x 7.44in) | ||||
| weight (fixture only) | 5,2kg | |||
| (12.61lbs) | ||||
| input voltage | 100-240V 50Hz/60Hz | |||
| power consumption | max 240W | |||
| light source | portman haloLED™ | RGBW GLOW | ||
| power | 3 x 60W | 6 x 12W | ||
| luminous flux | TBA | TBA | ||
| colour temperature | 1600K – 3200K | R G B + White 6000K | ||
| CRI | >80 | |||
| beam angle | 94o | |||
| DMX channels | 9, 15, 23, 39, 22, 37 | |||
| DMX modes | 6 | |||
| connectors | 2 x 5-PIN DMX | |||
| 1 x EtherCON | ||||
| 1 x AC powerCON TRUE1 (inlet and outlet) | ||||
| 1 x SMA (WDMX antenna) *optional | ||||
| other features | built-in drivers | |||
| Portman Colour Feedback System™ | ||||
| built-in macros | ||||
| WDMX module optional | ||||
| Appliance class | Class I | |||
| IP rating | IP20 | |||
| declarations of conformity | CE | UKCA | ||
PRODUCT OVERVIEW
Dimension
Pixel order
|
Back view
|
Kit content (what’s in the box)• 1x EVO ELEMENT™ • 1x AC power wire 2m • 1x User Manual • 1x hanging adapter • 1x spigot + cotter |
Optional accessories (not included)
|
· E-CONN™ connector · P2 EVO™ base · P2 EVO™ height adapter |
· male-male connector · W-DMX module · flight case |
EVO ELEMENT™ is fully compatible with the P2 EVO™ fixture and its accessories (base, hanging adaptor, spigot and cotter).
PREPARATION FOR USE
AC power connection
| Connection | EU wires | US wires | |
| Live | L | Brown | Black |
| Neutral | N | Blue | White |
| Earth | PE | Green/Yellow | Green or Green/Yellow |
Installation
EVO ELEMENT™ may be hung using 2 brackets on the back of the fixture with rigging clamps or hung using the hanging adapter (included). The fixture may be also installed on the the tripod or on a P2 EVO floor base (sold separately). To install the fixture on a tripod use the hanging adapter. You can also use a hanging adapter combined with the male-male connector, which makes it possible to put the fixture in the regular, not upside-down orientation. The fixture is compatible with E-Conn, the structure building accessory. Please refer to the E-CONN™ user manual for more information. Please note that the PIXEL order and MENU orientation can be changed in the menu to the upside down position.
To hang the fixture on a clamp under the truss you have to install the hanging adapter. Always double-check if the hanging adapter is attached properly to the fixture and the spigot is locked tightly. The back hanging brackets and the hanging adapter have 15 mm (0,59 in) holes for the spigot or rigging clamp. Before rigging operations make sure, that the structure onto which you are mounting the fixtures can withstand the weight of all of the fixtures. Check if there is enough room for ventilation, configuration and maintenance in the location where you want to place the fixture. You must secure every hanged fixture with the appropriate safety wire. Make sure there are no people under the work area when hanging fixtures. You can aim the fixture to any position that you want except towards the rigging structure. Remember not to let the power and DMX wires touch the surface of the fixture. Always keep a safe distance from the closest object.
The fixture may be installed also on optional accessories or original accessories attached to P2 EVO™.
Operation modes
| Event | Operating Mode | ||
| DMX | Master | Slave | |
| DMX wire connected | Reacts to DMX | Reacts to DMX | Reacts to DMX |
| WDMX connected | Reacts to WDMX | Stays in Master Mode | Receives control signal from Master unit |
| DMX disconnected | Keeps last DMX frame | Gets back to the last Macro or Manual setting | Receives control signal from Master unit |
| After power reset | All values default | Gets back to the last Macro or Manual setting | Receives control signal from Master unit |
RDM
Manual operation
DMX 512
When the fixture is being operated in the wireless mode (only when the WDMX card is installed) it is receiving DMX 512 signal from Wireless Solution Sweden transmitters and can send the signal throughout the 5-pin DMX OUT XLR socket. You can put the fixture with the WDMX card installed as the first fixture in a line and use it as a WDMX receiver. The fixture supports a bi-directional WDMX TRX module. It means, that the fixture supports RDM in wireless mode too. To link fixture with the WDMX transmitter first use the “UNPAIR ALL WDMX DEVICES” option from the menu, then turn the scanning mode on the transmitter. The transmitter will link with all unlinked devices. For more detailed information please refer to your transmitter’s user manual.
MENU
Portman Colour Feedback System (CFS)™
| Button colour | Fixture state |
| White | Fixture receives DMX or WDMX signal |
| Red flashing | The fixture is in DMX operating mode, but there is no DMX nor WDMX signal detected |
| Green | The fixture is in MASTER operating mode and there is no DMX signal detected |
| Blue flashing | The fixture is in SLAVE mode and there is no DMX nor MASTER signal detected |
| Blue | The fixture is in SLAVE mode and there is MASTER signal detected. There is no DMX signal. |
Menu map
| Main section | Level 1 | Level 2 | Level 3 | Description |
| MY DMX ADDRESS: | DMX ADDRESS | Sets up the DMX start address | ||
| MY PERSONAL SETTINGS | DMX MODE | SUPER SIMPLE | Sets up the DMX mode. Refer to DMX chart for DMX channels order. | |
| SIMPLE | ||||
| STANDARD | ||||
| STANDARD FINE | ||||
| PIXEL | ||||
| PIXEL FINE | ||||
| DMX INPUT | WIRED | Changes the DMX input to wired (default). In this mode, the fixture is receiving a DMX signal from the DMX IN 5 pin XLR socket. | ||
| WIRELESS | Changes the DMX input to wireless. This mode works only when the WDMX card is installed. Fixture is receiving DMX data from the WDMX card. | |||
| OPERATING MODE | DMX | Changes the fixture’s operating mode. Refer to the Operation Modes chapter for more info. DMX is default | ||
| MASTER | ||||
| SLAVE | ||||
| DIMM CURVE | LINEAR | Changes dimming curve of filaments. Halogen mode is emulating the behavior of halogen using also glow sources. Logarithmic is the default. | ||
| LOGARITHMIC | ||||
| FLICKER MODE | MODE 1 (2.4kHz) | Changes the frequency of the LED driving signals. | ||
| MODE 2 (5.1kHz) | ||||
| MODE 3 (12kHz) | ||||
| ORIENTATION | UP | Sets up the pixel order relation. Auto mode discovers the orientation of the fixture automatically and sets the first pixel of the fixture on the top. Please refer to Orientation chapter for more info | ||
| DOWN | ||||
| DISPLAY AND BUTTONS | DP BRIGHTNESS | Changes the parameters of display and buttons highlight. | ||
| DISPLAY OFF TIME | ||||
| WELCOME SCREEN | ||||
| NO DMX BTN FLASH | ||||
| RESET ALL TO DEFAULT | Resets all the options to default values. | |||
| WANNA GO WIRELESS? | UNPAIR ALL WDMX DEVICES | UNPAIRING MODE | Unpairs all connected WDMX transmitters | |
| WDMX MODE | G3 | Switches between WDMX modes | ||
| G4 | ||||
| G5 | ||||
| WDMX INFO | SIGNAL STRENGTH | Shows WDMX card info. | ||
| LINK STATUS | ||||
| RDM STATUS | ||||
| DMX DATA STATUS | ||||
| INFO ABOUT MYSELF | WHO MADE ME | Shows the name of the fixture’s manufacturer. | ||
| MY NAME IS | Shows the fixture’s name given by the manufacturer. | |||
| YOU CALL ME | Shows the fixture’s name given by the user. | |||
| MY ID IS | Shows the fixture’s RDM unique ID number. | |||
| MY VERSION IS | Shows actual firmware version | |||
| I WORKED HARD FOR | It Shows time the fixture has been turned on | |||
| CONTROL ME MANUALLY | MAIN SOURCES | INTENSITY | 0 – 100% BRIGHTNESS | Sets all main sources dimmer value |
| STROBE | 0 - 100% STROBE | Sets all main sources strobe value | ||
| GLOW | INTENSITY | 0 – 100% BRIGHTNESS | Sets glow all pixels dimmer value | |
| RED | 0 – 100% RED | Sets glow red value | ||
| GREEN | 0 – 100% GREEN | Sets glow green value | ||
| BLUE | 0 – 100% BLUE | Glow blue value | ||
| WHITE | 0 – 100% WHITE | Glow white value | ||
| MACRO | MACRO | MACRO NUMBER SELECT | Selects macro | |
| MACRO SPEED | MACRO SPEED | Sets the macro speed | ||
| MACRO INTENSITY | 0 – 100% BRIGHTNESS | Sets macro intensity value |
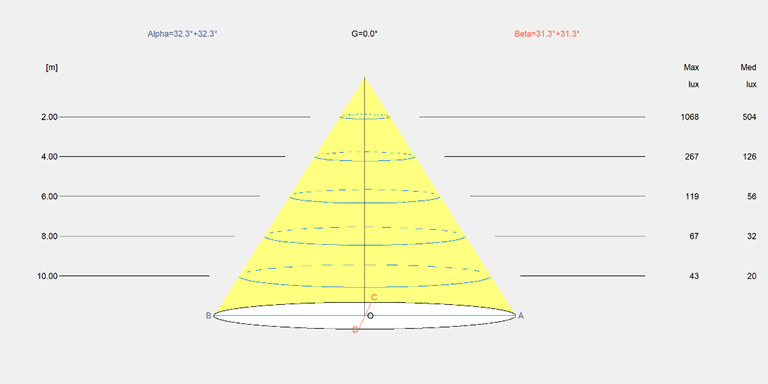
PHOTOMETRICS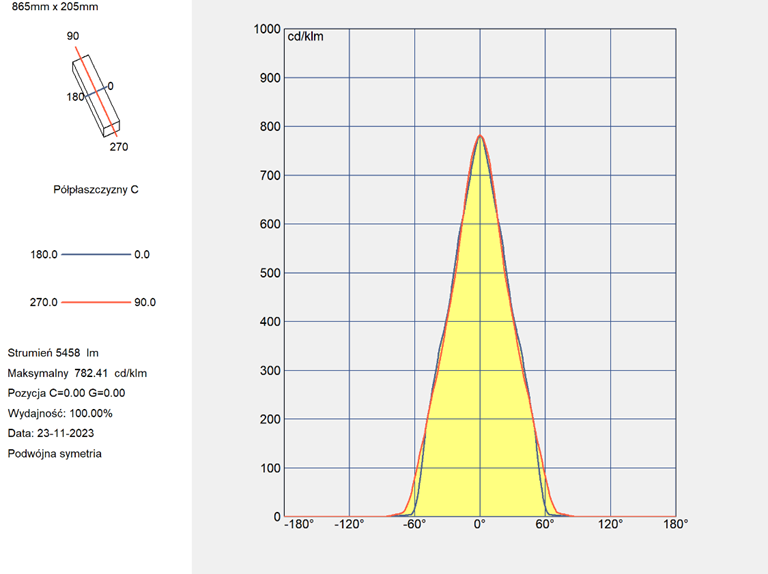

You will receive
an automatic ticket number. Our Support team has up to 48h to start resolving
the issue. You may be asked for more details by our support team or by a
distributor. Always use your ticket number for quicker resolution of the case.
Related Articles
User Manual [P2 EVO]
WELCOME Dear User, Thank you for choosing Portman P2 EVO™ – the original product with a registered design. We are proud to deliver you the highest quality, greatest design and real passion with our product. Each fixture in the Portman portfolio is ...User Manual [E-CONN]
WELCOME Dear User, Thank you for choosing Portman E-CONN™ – the original product with a registered design. We are proud to deliver you the highest quality, greatest design and real passion with our product. Each fixture in the Portman portfolio is ...User Manual [P1 EVO]
WELCOME Dear User, Thank you for choosing Portman P1 EVO™ – the original product with a registered design. We are proud to deliver you the highest quality, greatest design and real passion with our product. Each fixture in the Portman portfolio is ...User Manual [P3 EVO]
WELCOME Dear User, Thank you for choosing Portman P3 EVO™ – the original product with a registered design. We are proud to deliver you the highest quality, greatest design and real passion with our product. Each fixture in the Portman portfolio is ...User Manual [AMULET]
WELCOME Dear User, Thank you for choosing Portman AMULET™ – the original product with a registered design. We are proud to deliver you the highest quality, greatest design and real passion with our product. Each fixture in the Portman portfolio is ...