WELCOME
Dear User,
Thank you for choosing Portman P2 hexaline™ – the original product with a registered design.
We are proud to deliver you the highest quality, greatest design and real passion with our product.
Each fixture in the Portman portfolio is different, yet all of them ensure you the best performance to support your creativity.
FOR YOUR SAFETY, PLEASE READ THIS USER MANUAL CAREFULLY BEFORE YOUR INITIAL START-UP!
Please remember:
- any updates on this document,
- current products’ libraries,
- current products’ firmware,
- RMA procedure
can be found on our webpage in the support area:
WARNING! This product is for professional use only! It is not for household use.
This product presents a risk of lethal or severe injury due to heat, electric shock, fire or falls.
Intense and flashing light could trigger epileptic seizures. Read this manual before your
initial start-up and follow the safety information in this manual and engraved on the fixture.
Every person involved in the installation, service and maintenance of this device must be
qualified and have experience in working with stage lighting fixtures.
Before your initial start-up, please make sure that there is no damage caused by transportation.
Should there be any, consult your dealer and do not use the device.
Please consider that damages caused by manual modifications to the device are not subject to warranty.
CAUTION! Keep this device away from rain and moisture!
CAUTION! Be careful with your operations! With a dangerous voltage you can
suffer an electrical shock when touching the fixture and wires!
CAUTION! When in operation the fixture’s surface becomes hot. Allow the device
to cool down for approximately 30 minutes before any maintenance or service.
Keep a minimum 0,7-meter distance from flammable materials to the fixture.
CAUTION! Avoid looking directly into the light source (meant especially for epileptics)!
CAUTION! Unplug mains lead before opening the housing, installing the lamp or the fuse. Allow the device to cool approximately 1 hour prior to manipulating with it.
Protection against electrical shock
• Disconnect the fixture from AC power when not in use.
• Disconnect the fixture from AC power before any maintenance or service.
• Do not remove the rear cover. There are no user-serviceable parts inside.
• Always ground the fixture electrically.
• Use only the wires attached to the kit. If the power cable shows any sign of damage do not use it!
• Use only a source of AC power that complies with local building and electrical codes and has both overload and ground-fault protection.
• Do not expose the fixture to rain or moisture.
Protection against burns and fire
• Never operate when the fixture is damaged or some part is missing.
• Do not touch the surface when the fixture is in operation. The exterior of the fixture can reach temperatures up to 100°C (212°F). Allow the fixture to cool for approximately 30 minutes before any maintenance or service.
• Keep all combustible and flammable materials (for example fabric, wood, paper) at a distance of at least 1 meter away from the fixture. Do not cover the fixture when in operation and when it is hot.
• Do not modify the fixture.
• Do not operate the fixture if the ambient air temperature exceeds 45°C (113°F).
• Do not operate the fixture after an extreme change in the surrounding environment temperature. Allow the fixture to acclimate for at least an hour before operating.
Protection against falls
• Use only professional tripods and clamps to mount the fixture. Ensure, that the clamp or tripod is designed to withstand the weight of the fixture.
• Ensure that the structure intended for installation can hold at least 10 times the weight of all installed devices.
• Ensure that all fixtures are attached correctly to the structure and use an approved means of secondary attachment such as a safety cable.
• Block access below the work area whenever installing or removing the fixture.
Protection against eyesight damage and epileptic seizure
• Do not stare directly into the light sources. Never look at an exposed light source while it is lit.
• Provide advance notice that a flashlight is in use.
• Avoid long cycles of rapid flashing light.
• Always use safety glasses to protect your eyes when opening the front cover.
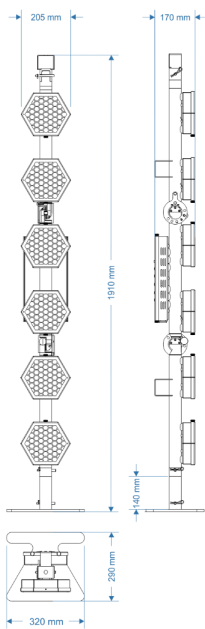
TECHNICAL SPECIFICATION
| dimensions |
1910 x 205 x 170mm |
| (75.2 x 8.07 x 6.70 in) |
| |
(height with hanging clamp and height adapter) |
| weight (fixture only) |
9 kg + 3 kg (base) |
| (19.84 lbs + 6.61 lbs (base)) |
| input voltage |
240V 50Hz/60Hz |
| max power consumption |
1900 |
| light source |
230W
R7s 118mm (max 300W) |
| channel
fuses |
F
2.0A |
| main
fuse |
T
0,2A |
| color
temperature |
2900
K |
| CRI |
>98,4 |
| beam angle |
94o |
| DMX channels |
6 |
| connectors |
2 x 5-PIN DMX (inlet and outlet) |
| 2
x 3-PIN DMX (inlet and outlet) |
| 1 x AC powerCON TRUE1 |
| 1 x SMA (WDMX antenna) *optional |
| other features |
built-in dimmers |
| built-in
display and buttons |
| WDMX module optional |
| Appliance class |
Class I |
| IP rating |
IP20 |
| declarations of conformity |
CE |
UKCA |
PRODUCT OVERVIEW
Dimension
Kit content (what’s in the box)
- 1 x Portman P2 hexaline
- 1 x base
- 1 x height adaptor
- 1 x hanging adaptor
- 3 x spigot with cotters
- 1 x spare bulb
- 1 x AC power wire (powerCON TRUE1)
- 1 x USER MANUAL
Optional accessories (not included)
- W-DMX module
- Flight Case
PREPARATION FOR USE
AC power connection
Luminaire must be powered with 200- 240V and 50/60Hz. This fixture will automatically detect the alternating current frequency. To turn on the fixture, simply plug in the powerCON TRUE1 and set the power switch to “ON”. Use only high quality 3 x 2.5 mm2 or larger mains power cords. Inspect all the power feed cables for damages before use. Make sure to always connect the fixtures to a protected circuit with an appropriate electrical ground. Never connect the fixture to a dimmer plug, even if it supplies proper current.
Only qualified electricians following all known electrical regulations can install the fixtures.
Luminaire comes with a power input cord terminated with powerCON TRUE1 on one end and tube connectors on the other end. Follow the rules from the table below to assemble the power plug to the wire:
| Connection | EU wires | US wires |
| Live | L | Brown | Black |
| Neutral | N | Blue | White |
| Earth | PE | Green/Yellow | Green or Green/Yellow
|
CAUTION! Do not use the power cord without a plug attached!
CAUTION! Always double-check the wire with a plug attached before use!
REMEMBER! Only a qualified person can change or install the plug!
Installation
Before mounting the fixture, read and follow all safety recommendations indicated in the Safety Information.
The Luminaire may be installed on attached base (also using the size
adaptor), hang on 2 points on the back of the fixture using rigging clamps or hang using
hanging adaptor. The fixture and the hanging adaptor have 15 mm hole for spigot or
rigging clamp. Before rigging operations make sure, that the structure onto which you
are mounting the fixtures can withstand the weight of all of the fixtures. Check if there
is enough room for ventilation, configuration and maintenance in a location where you
want to place the fixture. You must secure every hanged fixture with appropriate safety
wire.
CAUTION! Incorrect installation may result in the device falling and may damage it or cause damage to other objects!
REMEMBER! Always secure hanged fixture with safety wire!
REMEMBER! Always use attached spigots and cotters to install or hang the fixture using
base, height adaptor or hanging adaptor.
REMEMBER! Never use more than one unit on base or on hanging clamp without
additional safety support.
To change the angle of the fixture’s hinge, use the rounded spigot. Always hold both parts of the fixture! - pull the rounded spigot,
- change the position,
- lock the spigot in the right hole,
- check the lock.
Each arm can be moved from -30deg to +120deg.
REMEMBER! Never change position of hinges without additional safety support.
Lamp and fuse replacement
To replace the lamp:
- Disconnect the fixture from AC power.
- Make sure the fixture and lamps are cool.
- Open the front cover by releasing a screw located on top of the front cover.
- Gently push the lamp towards one of the mounting brackets and remove the used lamp by pulling it up.
- Put the new lamp onto the mounting brackets.
- Do not touch the new lamp with bare hands. Use gloves or a cloth to hold the lamp.
- Close the front cover and fasten the screw before applying power.
REMEMBER! Always use safety glasses to protect your eyes when changing a lamp!
Inspect the front covers and the front cover safety mesh before you use the fixture. If
you will notice any damages, holes in the mesh, or if the mesh will get loose, do not use
the fixture and immediately swap the front cover for a new one.
To replace the fuse:
- Disconnect the fixture from AC power.
- Make sure the fixture is cool.
- Fuses are located on the back cover of the fixture.
- To unscrew the fuse holder use “flat-blade” screwdriver. First gently push the cover of the fuse holder and rotate it a quarter turn clockwise.
- After you unlock cover of the fuse holder pull it up and replace the fuse.
- Put the cover with new fuse back to the fuse holder, gently push it with screwdriver in the proper orientation and rotate it a quarter turn counterclockwise.
Operation modes
The Portman P2 hexaline can work in three operation modes: Wired DMX mode,
Wireless DMX mode (if the WDMX card is installed) and standalone mode. You can link
The P2 hexaline to a DMX controller using a 5 or 3 pin DMX wire, or Wireless Solution
Sweden hardware (if WDMX card is installed). You can control each channel individually
whether with a DMX controller or a manual control build in the fixture. The P2 hexaline has got only one 6-channel DMX personality and it does support RDM.
RDM
RDM (Remote Device Management) is an enhancement of the DMX 512 protocol and allows bi-directional communication between DMX consoles and fixtures. It works simultaneously with DMX 512 and on the same lines and wires. RDM is not affecting non-RDM devices in a line however, non-RDM devices can disrupt communication with the console. RDM allows you to change the fixture’s options (such as DMX address) without even touching neither ladder or fixture’s buttons. The fixture fully supports the RDM standards.
Manual operation
The fixture works in manual operation when it’s not receiving DMX signal whether wired or wireless. You can adjust the brightness of all filaments at once from main screen, or you can control each source individually from the “MANUAL CONTROL” option in the menu (refer to the “Menu” chapter to learn how to manually control channels). To enter menu simply hold enter for 2 seconds.
DMX 512
The fixture automatically switches into DMX mode after receiving DMX data. To learn
how to change the DMX address or signal source (wired or wireless) refer to the “Menu”
chapter. When the fixture works in the wired DMX mode You can daisy chain fixtures
using 5 or 3 pin DMX wires. When daisy chaining remember, that you can connect up
to 32 devices per DMX 512 universe. Always terminate the DMX 512 line. Put the 120 Ω
terminator into last device’s DMX OUT XLR socket
When the fixture is being operated in the
wireless mode (only when the WDMX card is installed) it is receiving DMX 512
signal from Wireless Solution Sweden transmitters and can send the signal
throughout the 5-pin DMX OUT XLR socket. You can put the fixture with the WDMX
card installed as the first fixture in a line and use it as a WDMX receiver.
The fixture supports a bi-directional WDMX TRX module. It means, that the
fixture supports RDM in wireless mode too. To link fixture with the WDMX
transmitter first use the “UNPAIR ALL WDMX DEVICES” option from the menu, then
turn the scanning mode on the transmitter. The transmitter will link with all
unlinked devices. For more detailed information please refer to your
transmitter’s user manual.
REMEMBER! Always terminate DMX line!
Navigation buttons are located under the LCD display on the back panel. To enter the
menu hold enter button for 2 seconds. To navigate the menu use the “+” and “-“ buttons.
To exit the menu from any level hold enter for 2 seconds or use the exit function. For
confirming simply push the enter
button.
| Main section |
Level |
Desdcription |
| ADDRESS |
1-505 |
Sets up the DMX start address |
| DMX INPUT |
WIRED |
Changes the DMX input to wired (default). In this mode fixture is
receiving DMX signal from the DMX IN 5 pin XLR socket. |
| WIRELESS |
Changes the DMX input to wireless. This mode works only when WDMX card is
installed. Fixture is receiving DMX data from WDMX card. |
| RDM INFO |
MANUFACTURER |
Shows the name of the fixture’s manufacturer |
| DEVICE NAME |
Shows the fixture’s name given by manufacturer. |
| DDEVICE LABEL |
Shows the fixture’s name given by user. |
| RDM ID |
Shows the fixture’s RDM unique ID number. |
| FIRMARE VERSION |
Shows the fixture’s actual firmware version |
| UNPAIR WDMX |
|
Unlinks all linked Wireless Solution Sweden WDMX transmitters. |
| MANUAL CONTROL |
ALL CHAN: |
|
Controls the intensity of all channels at once. |
|
CHAN. 1 |
0-100% |
Individually controls the intensity of selected
channel |
|
CHAN. 2 |
0-100% |
|
CHAN. 3 |
0-100% |
|
CHAN. 4 |
0-100% |
|
CHAN. 5 |
0-100% |
|
CHAN. 6 |
0-100% |
| EXIT |
|
Exits from main section of the menu to main
screen. |
Thank you for buying
original products!
By buying original products you buy the real
quality but also support creativity and
progress in the industry.
Any problem and/or question according to fixtures
– contact us following these steps:
1. Send a message here:
support@portmanlights.com
Remember to add these important details:
[Serial number of the fixture]
[Issue description, videos, pictures]
2. Continue using a ticket number
You will receive
an automatic ticket number. Our Support team has up to 48h to start resolving
the issue. You may be asked for more details by our support team or by a
distributor. Always use your ticket number for quicker resolution of the case.
© 2016-2024 Portman Lights Sp. z o. o. All rights reserved.
The information and specifications are subject to change without notice.
Portman Lights Sp. z o. o. disclaims liability for any injury, damage, direct or indirect loss,
consequential or economic loss or any other loss occasioned by the use of,
inability to use or reliance on the information contained in this user manual.