W-DMX installation [P1 retro, P2 hexaline, P3 PIX3L, P1 mini]
Check if you have all parts required for installation. Portman W-DMX KIT contains :
- Antena
- W-DMX PCB
- Connecting wire
- 2 x M2,5 Screw with countersunk head (black)
- 2 x M2,5 Washer
- 2 x M2,5 Nut
- 2 x M4 Toothed washer
- 1 x M4 Nut
- 1 x Plastic Cap (black)
Proper for installation:
- You need Electronics Box Cover with holes specially made for the W-DMX antenna assembly.
- You can order new luminaires with holes ready for W-DMX. If you have old luminaires without that feature, you can purchase new covers with holes from us.
- Prepare your luminaires for repair. Be sure the luminaire is not connected to mains power before starting any operation on it.
- Unscrew the back cover of the electronic box.
- Unplug the power cables from the switch and ribbon cables from the CPU board.
- Unscrew the PE cable with socket wrench.
- Remove the Power Switch. Squeeze the pawls on the sides and push it out.
- Put something soft on your worktable to prevent scratching the cover. Some kind of tower, bubble foil or foam will be good.
- Remove the CPU board. Unscrew the CPU board – 4 screws. Use cross screwdriver.
- Take your new Cover with W-DMX holes.
- Assembly the CPU board. Use the same screws that you had on your old cover.
- Assembly the Power Switch. Just push it in. Remember to check where the on and off sides should be. Red switch – OFF should be directed to the bottom.
W-DMX installation:
- Mount the Connection wire. Put the golden socket into the cover from the inner side. Put the screw into holes from the outer side. Screws should go through the golden socket holes. Put the washers on threads. Screw the Nuts on. Use just your fingers to tight them so all things won’t fall apart. Tighten the screws with 1,5mm hex key.
- Use M4 toothed washer and nut to mount the PE cable. Put in exact order: first washer, cable, second washer and then the nut.
- Plug in the brown power cables. The one coming from the white plug on power supply should go to the upper side of the switch (ON side).
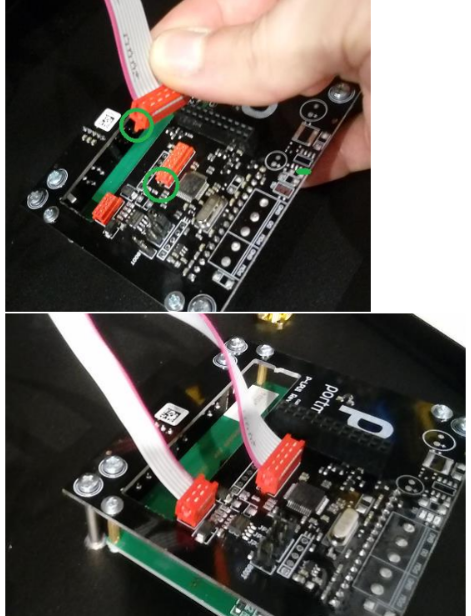
- Plug the ribbon cables to CPU board. The plug has a pin on one side and there is a hole in the board on one side of the socket. The pin and the hole should match together.

- Plug the Connection wire info W-DMX PCB
- Plug the W-DMX PCB into a socket on the CPU board.
- Close the Cover and screw it – 4 screws.
- You need to screw the antenna to use the W-DMX. Bend it and aim it to the top after screwing.
- To use W-DMX start the luminaire and go to the menu. Choose DMX settings and then DMX input. You can change input from WIRED to WIRELESS. You need to switch it when ever you change your physical DMX input.
- When You pack your luminaire to the box remember to remove the W- DMX antena. When it’s screwed, it’s sticking out beyond the outline of the luminaire.
Related Articles
User Manual [P1 mini]
WELCOME Dear User, Thank you for choosing Portman P1 mini™ – the original product with a registered design. We are proud to deliver you the highest quality, greatest design and real passion with our product. Each fixture in the Portman portfolio is ...
W-DMX installation [MANTIS, S-TRIBE, P1 EVO, P2 EVO, P3 EVO, EVO ELEMENT, AMULET]
Check if you have all parts required for installation. Portman W-DMX KIT contains : Antena W-DMX PCB Connecting wire 2 x M2,5 Screw with countersunk head (black) 2 x M2,5 Washer 2 x M2,5 Nut Proper for installation: You need Electronics Box Cover ...
Loose pixel [P1 retro, P2 hexaline]
Tools needed: Gloves Phillips screwdriver Steps: Place the device so that the pixels are facing upward Unscrew the thumbscrew and put down the pixel can cover Remove the filament (Hold the filament with a gloved hand only!). Tighten the screws ...
User Manual [P2 hexaline]
WELCOME Dear User, Thank you for choosing Portman P2 hexaline™ – the original product with a registered design. We are proud to deliver you the highest quality, greatest design and real passion with our product. Each fixture in the Portman portfolio ...
DMX CHART [P1 mini]
PIXEL ORDER DMX MODES Mode Simple DMX channel Parameter Descripton 1. Dimmer Main Source Ch. 1 Pixel 1 filament 8 bit dimmer 0 – 100% 2. Dimmer Main Source Ch. 2 Pixel 2 filament 8 bit dimmer 0 – 100% 3. Dimmer Main Source Ch. 3 Pixel 3 filament 8 ...